Yolov5学习笔记8——v6.0源码剖析——Head部分

Yolov5s网络结构总览

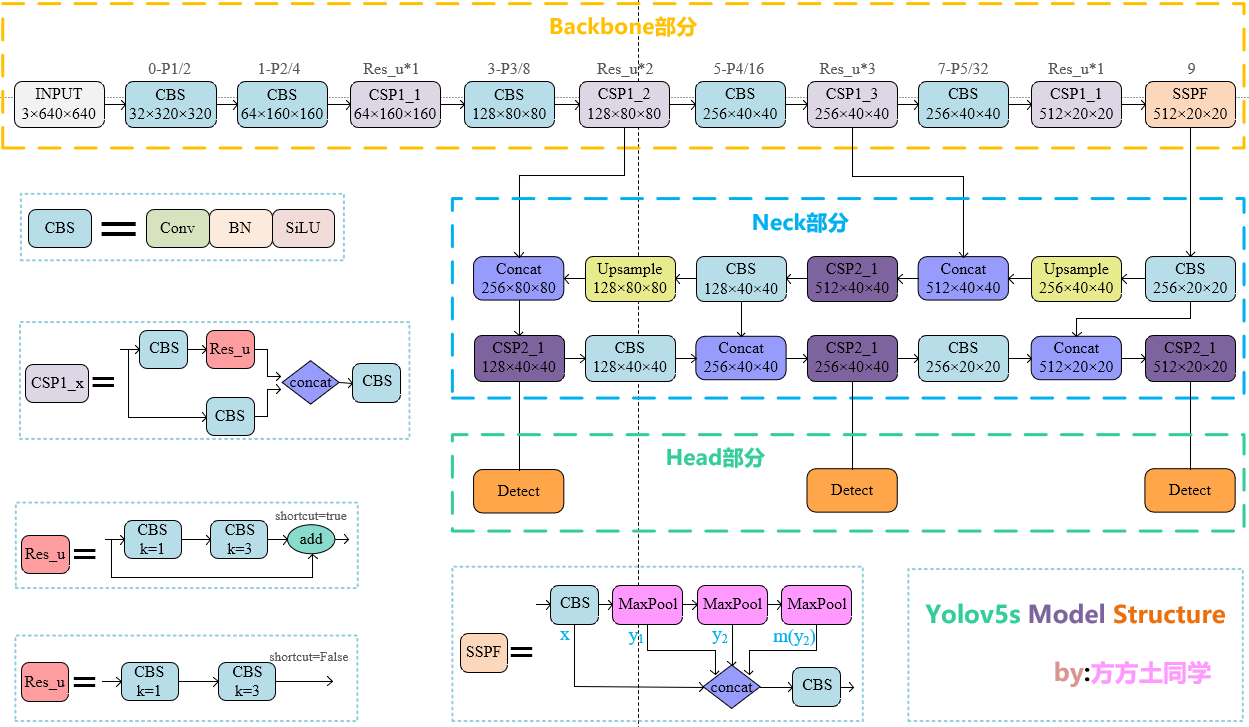
要了解head,就不能将其与前两部分割裂开。head中的主体部分就是三个Detect检测器,即利用基于网格的anchor在不同尺度的特征图上进行目标检测的过程。由下面的网络结构图可以很清楚的看出:当输入为640*640时,三个尺度上的特征图分别为:80x80、40x40、20x20。
Detect解析

Detect源码

1
2
3
4
5
6
7
8
9
10
11
12
13
14
15
16
17
18
19
20
21
22
23
24
25
26
27
28
29
30
31
32
33
34
35
36
37
38
39
40
41
42
43
44
45
46
47
48
49
class Detect(nn.Module):
stride = None # strides computed during build
onnx_dynamic = False # ONNX export parameter

def __init__(self, nc=80, anchors=(), ch=(), inplace=True): # detection layer
super().__init__()
self.nc = nc # number of classes
self.no = nc + 5 # number of outputs per anchor
self.nl = len(anchors) # number of detection layers
self.na = len(anchors[0]) // 2 # number of anchors
self.grid = [torch.zeros(1)] * self.nl # init grid
self.anchor_grid = [torch.zeros(1)] * self.nl # init anchor grid
self.register_buffer('anchors', torch.tensor(anchors).float().view(self.nl, -1, 2)) # shape(nl,na,2)
self.m = nn.ModuleList(nn.Conv2d(x, self.no * self.na, 1) for x in ch) # output conv
self.inplace = inplace # use in-place ops (e.g. slice assignment)

def forward(self, x):
z = [] # inference output
for i in range(self.nl):
x[i] = self.m[i](x[i]) # conv
bs, _, ny, nx = x[i].shape # x(bs,255,20,20) to x(bs,3,20,20,85)
x[i] = x[i].view(bs, self.na, self.no, ny, nx).permute(0, 1, 3, 4, 2).contiguous()

if not self.training: # inference
if self.onnx_dynamic or self.grid[i].shape[2:4] != x[i].shape[2:4]:
self.grid[i], self.anchor_grid[i] = self._make_grid(nx, ny, i)

y = x[i].sigmoid()
if self.inplace:
y[..., 0:2] = (y[..., 0:2] * 2 - 0.5 + self.grid[i]) * self.stride[i] # xy
y[..., 2:4] = (y[..., 2:4] * 2) ** 2 * self.anchor_grid[i] # wh
else: # for YOLOv5 on AWS Inferentia https://github.com/ultralytics/yolov5/pull/2953
xy = (y[..., 0:2] * 2 - 0.5 + self.grid[i]) * self.stride[i] # xy
wh = (y[..., 2:4] * 2) ** 2 * self.anchor_grid[i] # wh
y = torch.cat((xy, wh, y[..., 4:]), -1)
z.append(y.view(bs, -1, self.no))

return x if self.training else (torch.cat(z, 1), x)

def _make_grid(self, nx=20, ny=20, i=0):
d = self.anchors[i].device
if check_version(torch.__version__, '1.10.0'): # torch>=1.10.0 meshgrid workaround for torch>=0.7 compatibility
yv, xv = torch.meshgrid([torch.arange(ny, device=d), torch.arange(nx, device=d)], indexing='ij')
else:
yv, xv = torch.meshgrid([torch.arange(ny, device=d), torch.arange(nx, device=d)])
grid = torch.stack((xv, yv), 2).expand((1, self.na, ny, nx, 2)).float()
anchor_grid = (self.anchors[i].clone() * self.stride[i]) \
.view((1, self.na, 1, 1, 2)).expand((1, self.na, ny, nx, 2)).float()
return grid, anchor_grid

initial部分

1
2
3
4
5
6
7
8
9
10
11
def __init__(self, nc=80, anchors=(), ch=(), inplace=True):  # detection layer
super().__init__()
self.nc = nc # number of classes
self.no = nc + 5 # number of outputs per anchor
self.nl = len(anchors) # number of detection layers
self.na = len(anchors[0]) // 2 # number of anchors
self.grid = [torch.zeros(1)] * self.nl # init grid
self.anchor_grid = [torch.zeros(1)] * self.nl # init anchor grid
self.register_buffer('anchors', torch.tensor(anchors).float().view(self.nl, -1, 2)) # shape(nl,na,2)
self.m = nn.ModuleList(nn.Conv2d(x, self.no * self.na, 1) for x in ch) # output conv
self.inplace = inplace # use in-place ops (e.g. slice assignment)

initial部分定义了Detect过程中的重要参数

  1. **nc:**类别数目
  2. **no:**每个anchor的输出,包含类别数nc+置信度1+xywh4,故nc+5
  3. **nl:**检测器的个数。以上图为例,我们有3个不同尺度上的检测器:[[10, 13, 16, 30, 33, 23], [30, 61, 62, 45, 59, 119], [116, 90, 156, 198, 373, 326]],故检测器个数为3。
  4. **na:**每个检测器中anchor的数量,个数为3。由于anchor是w h连续排列的,所以需要被2整除。
  5. **grid:**检测器Detect的初始网格
  6. **anchor_grid:**anchor的初始网格
  7. m:每个检测器的最终输出,即检测器中anchor的输出no×anchor的个数nl。打印出来很好理解(60是因为我的数据集nc为15,coco是80):

forward

1
2
3
4
5
6
7
8
9
10
11
12
13
14
15
16
17
18
19
20
21
22
def forward(self, x):
z = [] # inference output
for i in range(self.nl):
x[i] = self.m[i](x[i]) # conv
bs, _, ny, nx = x[i].shape # x(bs,255,20,20) to x(bs,3,20,20,85)
x[i] = x[i].view(bs, self.na, self.no, ny, nx).permute(0, 1, 3, 4, 2).contiguous()

if not self.training: # inference
if self.onnx_dynamic or self.grid[i].shape[2:4] != x[i].shape[2:4]:
self.grid[i], self.anchor_grid[i] = self._make_grid(nx, ny, i)

y = x[i].sigmoid()
if self.inplace:
y[..., 0:2] = (y[..., 0:2] * 2 - 0.5 + self.grid[i]) * self.stride[i] # xy
y[..., 2:4] = (y[..., 2:4] * 2) ** 2 * self.anchor_grid[i] # wh
else: # for YOLOv5 on AWS Inferentia https://github.com/ultralytics/yolov5/pull/2953
xy = (y[..., 0:2] * 2 - 0.5 + self.grid[i]) * self.stride[i] # xy
wh = (y[..., 2:4] * 2) ** 2 * self.anchor_grid[i] # wh
y = torch.cat((xy, wh, y[..., 4:]), -1)
z.append(y.view(bs, -1, self.no))

return x if self.training else (torch.cat(z, 1), x)

在forward操作中,网络接收3个不同尺度的特征图,分别为:128×80×80、256×40×40、512×20×20

1
2
3
4
for i in range(self.nl):
x[i] = self.m[i](x[i]) # conv
bs, _, ny, nx = x[i].shape # x(bs,255,20,20) to x(bs,3,20,20,85)
x[i] = x[i].view(bs, self.na, self.no, ny, nx).permute(0, 1, 3, 4, 2).co

网络的循环次数为3,也就是依次在这3个特征图上进行网格化预测,利用卷积操作得到通道数为no×nl的特征输出。拿128x80x80举例,在nc=15的情况下经过卷积得到60x80x80的特征图,这个特征图就是后续用于格点检测的特征图。

1
2
3
if not self.training:  # inference
if self.onnx_dynamic or self.grid[i].shape[2:4] != x[i].shape[2:4]:
self.grid[i], self.anchor_grid[i] = self._make_grid(nx, ny, i)
1
2
3
4
5
6
7
8
9
10
def _make_grid(self, nx=20, ny=20, i=0):
d = self.anchors[i].device
if check_version(torch.__version__, '1.10.0'): # torch>=1.10.0 meshgrid workaround for torch>=0.7 compatibility
yv, xv = torch.meshgrid([torch.arange(ny, device=d), torch.arange(nx, device=d)], indexing='ij')
else:
yv, xv = torch.meshgrid([torch.arange(ny, device=d), torch.arange(nx, device=d)])
grid = torch.stack((xv, yv), 2).expand((1, self.na, ny, nx, 2)).float()
anchor_grid = (self.anchors[i].clone() * self.stride[i]) \
.view((1, self.na, 1, 1, 2)).expand((1, self.na, ny, nx, 2)).float()
return grid, anchor_grid

随后就是基于经过检测器卷积后的特征图划分网格,网格的尺寸是与输入尺寸相同的,如20x20的特征图会变成20x20的网格,那么一个网格对应到原图中就是32x32像素;40x40的一个网格就会对应到原图的16x16像素,以此类推。

1
2
3
4
5
6
7
8
9
y = x[i].sigmoid()
if self.inplace:
y[..., 0:2] = (y[..., 0:2] * 2 - 0.5 + self.grid[i]) * self.stride[i] # xy
y[..., 2:4] = (y[..., 2:4] * 2) ** 2 * self.anchor_grid[i] # wh
else: # for YOLOv5 on AWS Inferentia https://github.com/ultralytics/yolov5/pull/2953
xy = (y[..., 0:2] * 2 - 0.5 + self.grid[i]) * self.stride[i] # xy
wh = (y[..., 2:4] * 2) ** 2 * self.anchor_grid[i] # wh
y = torch.cat((xy, wh, y[..., 4:]), -1)
z.append(y.view(bs, -1, self.no))

这部分代码是预测偏移的主体部分。

y[..., 0:2] = (y[..., 0:2] * 2 - 0.5 + self.grid[i]) * self.stride[i] # xy

这一句是对x和y进行预测。x、y在输入网络前都是已经归一好的(0,1),乘以2再减去0.5就是(-0.5,1.5),也就是让x、y的预测能够跨网格进行。后边的self.grid[i]) * self.stride[i]就是将相对位置转为网格中的绝对位置。

y[..., 2:4] = (y[..., 2:4] * 2) ** 2 * self.anchor_grid[i] # wh

这句是对宽和高进行预测的。

z.append(y.view(bs, -1, self.no))

最后再将结果填入z。